【HTML】必应地图BingMaps的使用

又换新地图了,之前换了箩筐地图,效果不能满足实际需要,这次换成了必应地图BingMaps,同样实现设置考勤区域的功能,效果还是挺不错的。
相关阅读【HTML】html使用高德地图设置考勤范围 【HTML】箩筐地图的使用,设置考勤范围
一、 获取应用KEY
还是老样子,先注册账号,然后获取key。注册参考官方说明https://www.bingmap.cn/guide/db765008-dafe-11e8-a995-d46d6d978bfa?module=doc,这里不再过多说明。
二、 创建地图
1. 引入js
参考官网说明https://www.bingmap.cn/guide/db150325-dafe-11e8-9e65-d46d6d978bfa?module=doc
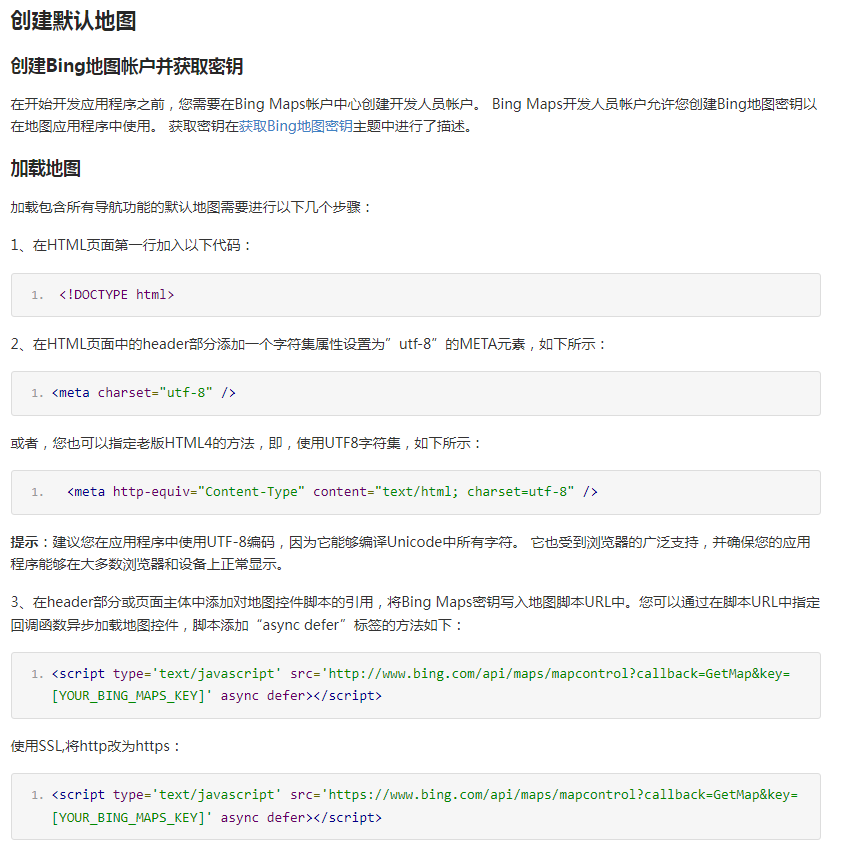
注意:官方说明引入js的方法,包含了回调方法callback,即js引入完成后,会调用GetMap方法,我们可以在GetMap方法里面开始创建地图,如下所示:
<!DOCTYPE html>
<html>
<head>
    <title></title>
    <meta charset="utf-8" />
    <!-- Reference to the Bing Maps SDK -->
    <script type='text/javascript'
            src='http://www.bing.com/api/maps/mapcontrol?callback=GetMap&key=[YOUR_BING_MAPS_KEY]'
            async defer></script>
    <script type='text/javascript'>
    function GetMap()
    {
        var map = new Microsoft.Maps.Map('#container',{});
        //在此添加地图加载代码
    }
    </script>
</head>
<body>
    <div id="myMap" style="position:relative;width:600px;height:400px;"></div>
</body>
</html>
同样的,如果引入js的时候,我们不加入callback回调方法,也可以在js加载完成后,页面初始化的时候,直接使用加载地图,下面是我使用的方法:
<script type='text/javascript' src='https://www.bing.com/api/maps/mapcontrol?setMkt=zh-CN&setLang=zh-CN&key=xxxxxxxx' async defer></script>
<script type="text/javascript">
    var zoom = 16;
    var position = new Microsoft.Maps.Location(34.74718857, 113.62535095);
    var searchManager = null;
    $(function(){
        var map = new Microsoft.Maps.Map('#container',{
                center: position,
                zoom:zoom
            });
    })
</script>
其中#container是我们的地图容器:
<div class="layui-form-item nowrap" style="margin-left: 40px;">
            <div id="container"></div>
        </div>
给容器设置宽高:
<style>
    #container {
        width: 100%;
        height: 300px;
    }
</style>
和高德地图以及箩筐地图不同之处:
a. 在创建地图时,必应地图是需要加上#的,或者使用document.getElementById('container')。
b. 高德地图和箩筐地图坐标使用时,是纬度在前,经度在后,而必应地图的坐标是经度在前,纬度在后,如果写反,地图显示不出来。
2. 其他参数设置
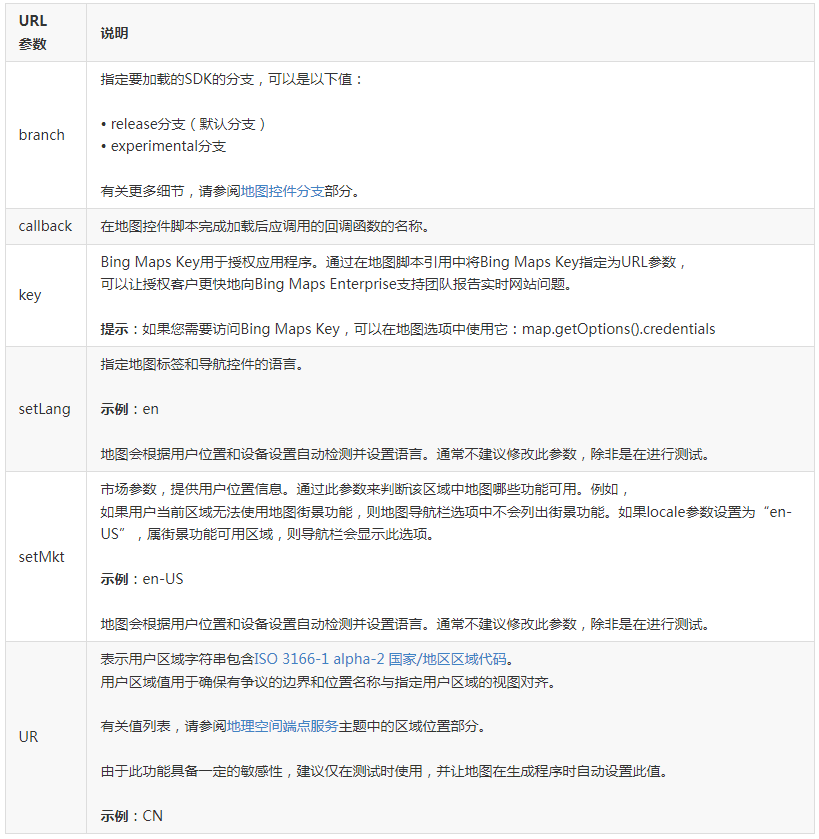
引入js的时候,设置为中文简体setLang=zh-CN和setMkt=zh-CN,另外,在查看官方demo的时候,他们会把参数写为mkt=zh-CN,这种应该也是可以的。
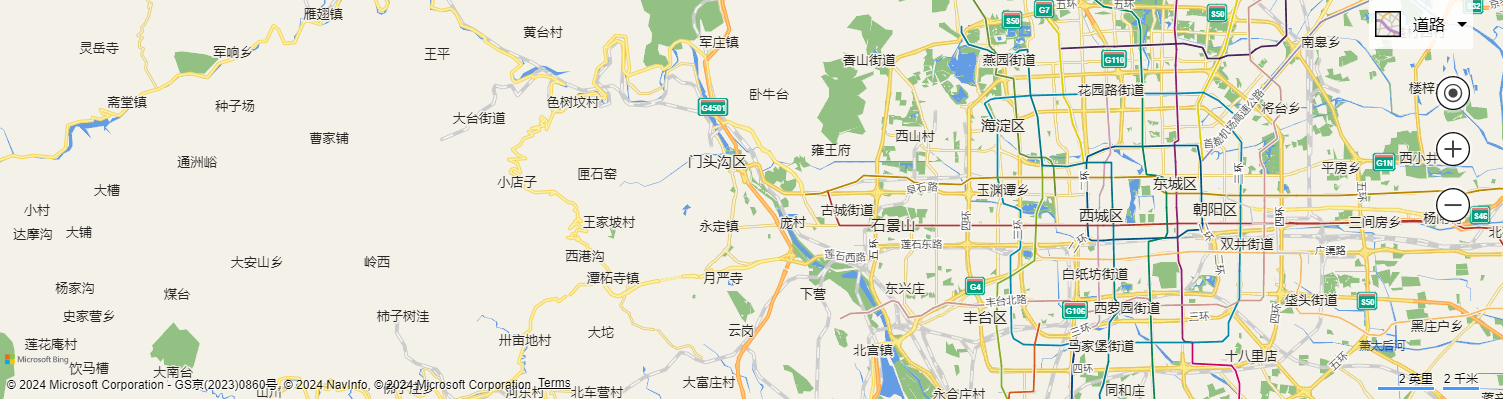
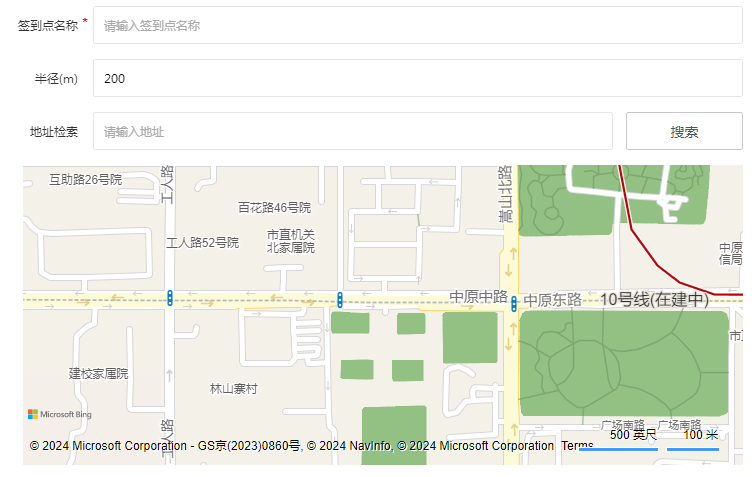
到这里,我们的地图已经可以正常显示了,显示的地图效果:
3. 设置中心点和地图级别
这个功能和高德地图以及箩筐地图相同,创建地图时给一个中心点坐标center和和地图级别zoom,
var zoom = 16;
var position = new Microsoft.Maps.Location(34.74718857, 113.62535095);
var map = new Microsoft.Maps.Map('#container',{
                center: position,
                zoom:zoom
            });
不同的是,这里我没有找到修改中心点坐标center和地图级别zoom的方法(也可能有但我没找到...)
还有其他设置,大家可自行使用https://www.bingmap.cn/guide/e6530f1e-dafe-11e8-9cfb-d46d6d978bfa?module=doc
4. 去除地图控件
根据我们的功能,我们不需要地图右侧显示的操作按钮,可使用如下方法隐藏:
map.setOptions({
    showDashboard: false
});
效果如下:
三、 根据地址获取坐标
这里需要用到用户输入地理编码功能,参考官网demohttps://www.bingmap.cn/guide/f115b9f8-dafe-11e8-aabe-d46d6d978bfa?module=doc,
加载地图组件,并根据页面输入地址,出发检索方法获取坐标
var searchManager = null;
Microsoft.Maps.loadModule('Microsoft.Maps.Search', function () {
searchManager = new Microsoft.Maps.Search.SearchManager(map);
});
function address_search()
{
var query = document.getElementById('addr').value;
var searchRequest = {
where: query,
callback: function (answer, userData) {
console.log(answer);
if (answer.results[0])
{
//设置坐标值
var location = answer.results[0].location['longitude'] + "," + answer.results[0].location['latitude'];
$('#Gps').val(location);
map.entities.clear();
map.setView({ bounds: answer.results[0].bestView });
map.entities.push(new Microsoft.Maps.Pushpin(answer.results[0].location));
var center = new Microsoft.Maps.Location(answer.results[0].location['latitude'], answer.results[0].location['longitude']);
Microsoft.Maps.loadModule('Microsoft.Maps.SpatialMath', function () {
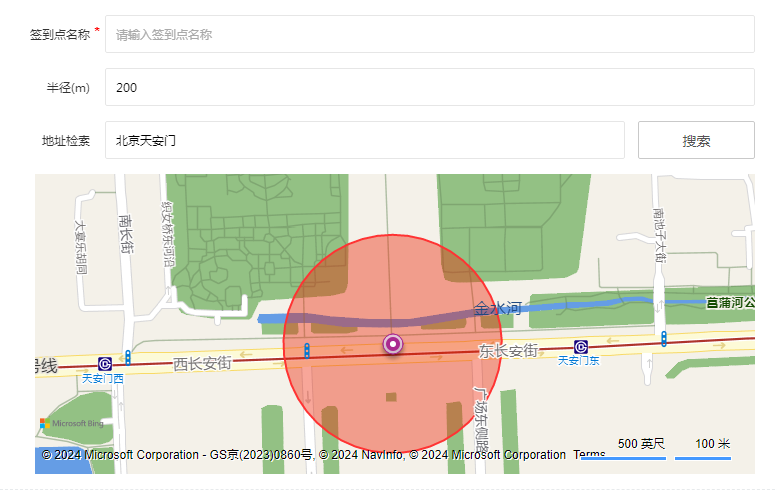
var circle = createCircle(center); // 半径为 200 米,填充为绿色透明,边框为红色
map.entities.push(circle);
});
var pin, pins = [], locs = [], output = '搜索结果:<br/>';
//Add a pushpin for each result to the map and create a list to display.
for (var i = 0; i < answer.results.length; i++) {
//Create a pushpin for each result.
if (i == 0)
{
//这里使用点标记,把获取到的地址坐标在地图上标记出来
pin = new Microsoft.Maps.Pushpin(answer.results[i].location, {
text: i + ''
});
pins.push(pin);
}
}
//Add the pins to the map
map.entities.push(pins);
}
else
{
layer.msg("该地址不存在",{time:800});
}
},
errorCallback: function (e) {
//If there is an error, alert the user about it.
layer.msg("该地址不存在",{time:800});
}
};
//Make the geocode request.
searchManager.geocode(searchRequest);
}
//给搜索按钮绑定点击事件
document.getElementById('search').onclick = address_search;同样的,根据地址可能获取多多个地址坐标,大家根据需要使用,这里我们只获取第一个地址的坐标,并使用点标记功能,把获取到的地址坐标在地图上标记出来。
注意:因为必应地图坐标是反着来得(经度在前,纬度在后),为了和之前的坐标值对应(纬度在前,经度在后),需要调整好顺序存储。
四、 根据获取到的坐标,绘制圆形区域
必应地图没有直接绘制圆形区域的方法,只有绘制折线多边形区域的方法,最后采用切圆的方法,设置半径后,设置了360个边线,这样看起来就是个近似的圆
参考官网方法https://www.bingmap.cn/guide/e8493630-dafe-11e8-9ad4-d46d6d978bfa?module=doc
/**
         * 绘制圆形覆盖物
         * @param center
         */
        function createCircle(center) {
            //获取页面设置的半径
            var radius = $('#Radius').val();
            // Calculate the locations for a regular polygon that has 36 locations which will result in an approximate circle.
            //配置参数
            var locs = Microsoft.Maps.SpatialMath.getRegularPolygon(center, radius, 360, Microsoft.Maps.SpatialMath.DistanceUnits.Meters);

            //绘制图形
            return new Microsoft.Maps.Polygon(locs, {
                fillColor: 'rgba(238,34,0,0.4)',//填充色
                strokeColor: '#F33',//边线颜色
                strokeThickness: 2    //边线粗细
            });
        }
这里使用SpatialMath控件,同样需要先加载组件再使用
Microsoft.Maps.SpatialMath.getRegularPolygon(center, radius, 360, Microsoft.Maps.SpatialMath.DistanceUnits.Meters);
其中center是中心坐标点,radius是半径,360是多边形的边数,Microsoft.Maps.SpatialMath.DistanceUnits.Meters是半径的单位,这里我们设置为米。
最后需要把绘制好的圆形加载到地图上
var circle = createCircle(center);
map.entities.push(circle);
非常好的一点是,加载完覆盖物之后,地图会自动将覆盖物移动到地图中间,方便查看,也省去了再去切换地图中心点,最终效果。
五、 完整代码
<script type='text/javascript' src='https://www.bing.com/api/maps/mapcontrol?setMkt=zh-CN&setLang=zh-CN&key=xxxxxxxxxxxxxxxxxxxx' async defer></script>
<form class="layui-form layui-card" action="{:request()->url()}" data-auto="true" method="post" autocomplete="off">
    <div class="layui-card-body">
        <div class="layui-form-item">
            <label class="layui-form-label label-required">签到点名称</label>
            <div class="layui-input-block">
                <input name="name" maxlength="20" value='{$vo.name|default=""}' required placeholder="请输入签到点名称" class="layui-input">
            </div>
        </div>
        <div class="layui-form-item nowrap">
            <label class="layui-form-label">半径(m)</label>
            <div class="layui-input-block">
                <input name="radius" id="Radius" maxlength="5" value='{$vo.radius|default="200"}'  placeholder="请输入半径" class="layui-input">
            </div>
        </div>
        <div class="layui-form-item nowrap">
            <label class="layui-form-label">地址检索</label>
            <div class="layui-input-block">
                <input name="address" id="addr" value='{$vo.address|default=""}'  placeholder="请输入地址" class="layui-input" style="width: 80%;">
                <button type="button" data-title="搜索" id="search" class='layui-btn layui-btn-primary'>搜索</button>
            </div>
        </div>
        <div class="layui-form-item nowrap" style="margin-left: 40px;">
            <div id="container"></div>
        </div>


    </div>

    <div class="hr-line-dashed"></div>
    {notempty name='vo.id'}<input type='hidden' value='{$vo.id}' name='id'>{/notempty}

    <div class="layui-form-item text-center">
        <input type="hidden" id="Gps" name="gps" value="{$vo.gps|default=''}">
        <button class="layui-btn" type='submit'>保存数据</button>
        <button class="layui-btn layui-btn-danger" type='button' data-confirm="确定要取消编辑吗?" data-close>取消编辑</button>
    </div>

    <script>window.form.render();</script>
</form>
<style>
    #container {
        width: 100%;
        height: 300px;
    }
    #search {
        position: absolute;
        right: 0;
        top: 0;
        width: 18%;
    }
</style>
<script type="text/javascript">
    var zoom = 16;
    var position = new Microsoft.Maps.Location(34.74718857, 113.62535095);
    var searchManager = null;
    $(function(){
        var gps = $('#Gps').val();
        if (gps)
        {
            var location = gps.split(',');
            console.log(location);
            var center = new Microsoft.Maps.Location(location[1],location[0]);
            var map = new Microsoft.Maps.Map('#container',{
                center: center,
                zoom:zoom
            });
            Microsoft.Maps.loadModule('Microsoft.Maps.SpatialMath', function () {
                var circle = createCircle(center); // 半径为 200 米,填充为绿色透明,边框为红色
                map.entities.push(circle);
            });
        }
        else
        {
            var map = new Microsoft.Maps.Map('#container',{
                center: position,
                zoom:zoom
            });

        }
        map.setOptions({
            showDashboard: false
        });

        Microsoft.Maps.loadModule('Microsoft.Maps.Search', function () {
            searchManager = new Microsoft.Maps.Search.SearchManager(map);
        });
        function address_search()
        {
            var query = document.getElementById('addr').value;
            var searchRequest = {
                where: query,
                callback: function (answer, userData) {
                    console.log(answer);

                    if (answer.results[0])
                    {
                        //设置坐标值
                        var location = answer.results[0].location['longitude'] + "," + answer.results[0].location['latitude'];
                        $('#Gps').val(location);

                        map.entities.clear();
                        map.setView({ bounds: answer.results[0].bestView });
                        map.entities.push(new Microsoft.Maps.Pushpin(answer.results[0].location));

                        var center = new Microsoft.Maps.Location(answer.results[0].location['latitude'], answer.results[0].location['longitude']);
                        Microsoft.Maps.loadModule('Microsoft.Maps.SpatialMath', function () {
                            var circle = createCircle(center); // 半径为 200 米,填充为绿色透明,边框为红色
                            map.entities.push(circle);
                        });

                        var pin, pins = [], locs = [], output = '搜索结果:<br/>';
                        //Add a pushpin for each result to the map and create a list to display.
                        for (var i = 0; i < answer.results.length; i++) {
                            //Create a pushpin for each result.
                            if (i == 0)
                            {
                            	pin = new Microsoft.Maps.Pushpin(answer.results[i].location, {
	                                text: i + ''
	                            });
	                            pins.push(pin);
                            }
                        }

                        //Add the pins to the map
                        map.entities.push(pins);
                    }
                    else
                    {
                        layer.msg("该地址不存在",{time:800});
                    }
                },
                errorCallback: function (e) {
                    //If there is an error, alert the user about it.
                    layer.msg("该地址不存在",{time:800});
                }
            };
            //Make the geocode request.
            searchManager.geocode(searchRequest);
        }

        document.getElementById('search').onclick = address_search;

        /**
         * 绘制圆形覆盖物
         * @param center
         */
        function createCircle(center) {
            var radius = $('#Radius').val();
            // Calculate the locations for a regular polygon that has 36 locations which will result in an approximate circle.
            var locs = Microsoft.Maps.SpatialMath.getRegularPolygon(center, radius, 360, Microsoft.Maps.SpatialMath.DistanceUnits.Meters);

            return new Microsoft.Maps.Polygon(locs, {
                fillColor: 'rgba(238,34,0,0.4)',
                strokeColor: '#F33',
                strokeThickness: 2
            });
        }
    })
</script>
六、 总结
必应地图实现了我们想要的功能,其中有优点也有不足,首先加载非常快,这点可以和高德地图媲美,箩筐地图就差了点,另外作为世界范围的地图,搜索地址时,需要把省市区尽可能都加上,一不小心就会定到国外去了,还有,国内地图的信息不足,好多地方只显示地图区域,但这个区域确没有名字,信息上不能和高德相比,也会在使用中带来一些不便。
猜你喜欢
- 【前端】vite+vue3+ts 项目安装 Ant Design of Vue方法
- 安装 Ant Design of Vue 和@ant-design/icons-vue图标库npm add ant-design-vue @ant-design/icons-vue安装插件 unplugin-vue-components 配合vite可以自动帮我们引入组件npm add unplugin-vue-components -D配置 vite.config.tsimport {&nbs
- 【前端】Nodejs基于Windows安装教程
- 一、安装环境在进行 Node.js 环境的安装之前,您需要先安装并配置好以下环境:操作系统:Windows命令行工具:Node.js 是通过命令行工具进行使用和管理的,因此您需要选择一个适合您的命令行工具。在 Windows 上,您可以选择使用命令提示符(cmd)或 PowerShell。文本编辑器:Node.js 应用程序通常是使用文本编辑器编写的,因此您需要选择一个适合您的文本编辑器。常用的文本编辑器包括 Visual Studio Code、Sublime Text、Atom 等。网络连接
- 【前端】PHP开发者的Vue与React入门指南
- PHP是一种常用的服务器端脚本语言,用于开发动态网页和网站。许多PHP开发者经常需要学习前端框架来提升他们的技能,并且Vue.js和React.js是两个当前非常热门的前端框架。本文将为PHP开发者提供一份Vue.js和React.js的入门指南,带有具体的代码示例,帮助他们快速了解这两个框架的基本概念和用法。1. Vue.js入门指南Vue.js是一款轻量级的JavaScript框架,用于构建交互式的用户界面。下面是一个简单的Vue.js示例,展示了如何创建一个基本的Vue组件并进行数据绑定:
- 【前端】PHP、Vue和React:如何选择最适合的前端框架?
- PHP、Vue和React:如何选择最适合的前端框架?随着互联网技术的不断发展,前端框架在Web开发中起着至关重要的作用。PHP、Vue和React作为三种具有代表性的前端框架,每一种都具有其独特的特点和优势。在选择使用哪种前端框架时,开发人员需要根据项目需求、团队技能和个人偏好做出明智的决策。本文将通过比较PHP、Vue和React这三种前端框架的特点和使用场景,帮助读者更好地选择最适合自己的前端框架。PHPPHP作为一种服务器端脚本语言,被广泛应用于Web开发中。尽管PHP主要用于后端开发,
- 【前端】前端网络安全
- 今天思考下前端源码安全的东西(不是前端安全,只是针对于源码部分)。在我看来,源码安全有两点,一是防止抄袭,二是防止被攻破。实际上讲,前端的代码大多是没有什么可抄袭性,安全更是形同虚设的(任何前端输入都是不能相信的)。但如果还是想防止源码被查看,HTML、CSS并不能做什么,最终都会用露出来(最简单用Chrome开发者工具就可以看到),所以只能针对JS做文件的压缩合并和混淆。关于抄袭其实就前端来讲,代码没有什么好抄袭的,大多人都是抄UI设计(这个是躲不了),还有一些富前端的控件和算法,重要之处还是
- 【前端】微信小程序推送订阅消息
- 业务需要,商城类小程序,要在用户下单支付成功后,推送消息通知用户。首先想到的是小程序模板消息,微信公众号模板消息已经用过很多了,小程序模板消息确是第一次做。小程序模板消息 参考https://developers.weixin.qq.com/miniprogram/dev/framework/open-ability/template-message.html 小程序模板消息在2020年已经改版了,现在推送模板消息都会推送到服务通知里面,
- 【前端】Ant Design of Vue安装
- 关于 ant-design-vue #众所周知,Ant Design 作为一门设计语言面世,经历过多年的迭代和积累,它对 UI 的设计思想已经成为一套事实标准,受到众多前端开发者及企业的追捧和喜爱,也是 React 开发者手中的神兵利器。希望 ant-design-vue 能够让 Vue 开发者也享受到 Ant Design 的优秀设计。ant-design-vue 是 Ant Design 的 Vue 实现,组件的风格与 Ant Design 保持同步,组件的 html 结构和 cs