【C#】C# Winfrom 常用功能整合-1
目录
Winfrom TabControl选项卡 动态添加,删除,修改
Winform FlowLayoutPanel 控件居中排列
Winform 最大化遮挡任务栏和全屏显示问题
在打开最大化窗体时,如果不进行配置,那么默认情况下窗体是被任务栏档住,导致有部分界面看不见,看看下面代码的效果,也许对你有帮助
新建一个Winform项目,添加三个按钮,给三个按钮添加点击事件

代码:
using System;
using System.Collections.Generic;
using System.ComponentModel;
using System.Data;
using System.Drawing;
using System.Linq;
using System.Text;
using System.Threading.Tasks;
using System.Windows.Forms;

namespace Test5
{
    public partial class Form1 : Form
    {
        public Form1()
        {
            InitializeComponent();
        }

        private Size WindowMaximumSize;

        private void Form1_Load(object sender, EventArgs e)
        {
            WindowMaximumSize = this.MaximumSize;
            this.TopMost = true;
        }

        private void button1_Click(object sender, EventArgs e)
        {
            //任务栏不会被遮挡
            if (this.WindowState == FormWindowState.Maximized)
            {
                this.WindowState = FormWindowState.Normal;
            }
            else
            {
                this.WindowState = FormWindowState.Maximized;
            }
        }

        private void button2_Click(object sender, EventArgs e)
        {
            //任务栏会被遮挡
            if (this.WindowState == FormWindowState.Maximized)
            {
                this.FormBorderStyle = FormBorderStyle.FixedSingle;
                this.WindowState = FormWindowState.Normal;
            }
            else
            {
                this.FormBorderStyle = FormBorderStyle.None;
                this.MaximumSize = WindowMaximumSize;
                this.WindowState = FormWindowState.Maximized;
            }
        }

        private void button3_Click(object sender, EventArgs e)
        {
            //任务栏不会被遮挡
            if (this.WindowState == FormWindowState.Maximized)
            {
                this.FormBorderStyle = FormBorderStyle.FixedSingle;
                this.WindowState = FormWindowState.Normal;
            }
            else
            {
                this.FormBorderStyle = FormBorderStyle.FixedSingle;
                this.MaximumSize = new Size(Screen.PrimaryScreen.WorkingArea.Width, Screen.PrimaryScreen.WorkingArea.Height);
                this.WindowState = FormWindowState.Maximized;
            }
        }

    }
}
效果:
点击按钮1,会最大化,但窗体不会遮挡任务栏,
点击按钮2,会全屏显示,
点击按钮3,会最大化,但窗体不会遮挡任务栏
Winfrom 给图片画 矩形,椭圆形,文字
        private void Button_Test_Click(object sender, EventArgs e)
        {
            string path = TextBox_Img1Path.Text;
            if (string.IsNullOrEmpty(path))
            {
                Console.WriteLine("路径不能为空");
                return;
            }
            if (!System.IO.File.Exists(path))
            {
                Console.WriteLine("图片不存在");
                return;
            }

            Bitmap bitmap = new Bitmap(path);
            Point point1 = new Point(100, 100);
            Point point2 = new Point(120, 120);

            //bitmap = DrawRoundInPicture(bitmap, point1, point2, Color.Red, 3, "起泡");
            //pictureBox1.Image = bitmap;

            Size size = new Size();
            size.Width = 200;
            size.Height = 200;
            Bitmap bitmap1 = DrawRectangleInPicture(bitmap, point1, size, Color.Red, 2, "气泡", 13);
            pictureBox1.Image = bitmap1;

            //Point point3 = new Point(200, 200);
            //Point point4 = new Point(210, 210);
            //bitmap = DrawRoundInPicture(bitmap, point3, point4, Color.AntiqueWhite, 3, "破裂");
            //bitmap.Save(path, System.Drawing.Imaging.ImageFormat.Bmp);
        }

        /// <summary>
        /// 在图片上画椭圆
        /// </summary>
        /// <param name="bmp">图片的bitmap</param>
        /// <param name="p0">位置</param>
        /// <param name="lineColor">颜色</param>
        /// <param name="lineWidth">圆圈厚度</param>
        /// <param name="text">标题</param>
        /// <param name="ds">线条的线型</param>
        /// <returns></returns>
        public static Bitmap DrawRoundInPicture(Bitmap bmp, Point p0, Point p1, Color lineColor, int lineWidth, string text, DashStyle ds = DashStyle.Solid)
        {
            if (bmp == null) return null;

            Graphics g = Graphics.FromImage(bmp);

            Brush brush = new SolidBrush(lineColor);
            Pen pen = new Pen(brush, lineWidth);
            pen.DashStyle = ds;

            //画椭圆
            //g.DrawEllipse(pen, new Rectangle(p0.X, p0.Y, Math.Abs(p0.X - p1.X), Math.Abs(p0.Y - p1.Y)));
            //画矩形
            g.DrawRectangle(pen, p0.X, p0.Y, 20, 20);

            Font myFont = new Font("宋体", 30, FontStyle.Bold);
            Brush bush = new SolidBrush(lineColor);//填充的颜色
            g.DrawString(text, myFont, bush, p0.X - 30, p1.Y + 10);

            g.Dispose();

            return bmp;
        }

        /// <summary>
        /// 图片上画矩形和标记文字
        /// </summary>
        /// <param name="bmp">图片bitmap</param>
        /// <param name="pos">矩形的坐标位置</param>
        /// <param name="size">矩形的宽高</param>
        /// <param name="lineColor">线条的颜色</param>
        /// <param name="lineWidth">线条</param>
        /// <param name="text">矩形的文本</param>
        /// <param name="fontSize">字体大小</param>
        /// <param name="ds">线条的线型</param>
        /// <returns></returns>
        public static Bitmap DrawRectangleInPicture(Bitmap bmp, Point pos, Size size, Color lineColor, int lineWidth, string text, int fontSize, DashStyle ds = DashStyle.Solid)
        {
            if (bmp == null) return null;

            Graphics g = Graphics.FromImage(bmp);

            Brush brush = new SolidBrush(lineColor);
            Pen pen = new Pen(brush, lineWidth);
            pen.DashStyle = ds;

            //画中心点(用于测试)
            //g.DrawEllipse(pen, new Rectangle(pos.X, pos.Y, 3, 3));

            //画矩形
            int rectX = pos.X - (size.Width / 2);
            int rectY = pos.Y - (size.Height / 2);
            //g.DrawRectangle(pen, pos.X, pos.Y, size.Width, size.Height);
            g.DrawRectangle(pen, rectX, rectY, size.Width, size.Height);

            Font myFont = new Font("宋体", fontSize, FontStyle.Regular);
            Brush bush = new SolidBrush(lineColor);//填充的颜色

            //计算字体的长度
            SizeF sizeF = g.MeasureString(text, myFont);
            int fontPosX = (int)(pos.X - (sizeF.Width / 2));
            int fontPosY = (int)(pos.Y + (sizeF.Height / 2) + (size.Height / 2));
            Console.WriteLine();
            g.DrawString(text, myFont, bush, fontPosX, fontPosY);
            g.Dispose();

            return bmp;
        }
Winfrom TabControl选项卡 动态添加,删除,修改
效果:

代码
using System;
using System.Collections.Generic;
using System.ComponentModel;
using System.Data;
using System.Drawing;
using System.Linq;
using System.Text;
using System.Threading.Tasks;
using System.Windows.Forms;

namespace 选项卡
{
    public partial class Form1 : Form
    {
        public Form1()
        {
            InitializeComponent();
        }

        private int index = 0;

        private void Form1_Load(object sender, EventArgs e)
        {

        }


        private void button1_Click(object sender, EventArgs e)
        {
            TabPage Page = new TabPage();
            Page.Name = "Page" + index.ToString();
            Page.Text = "tabPage" + index.ToString();
            Page.TabIndex = index;
            this.tabControl1.Controls.Add(Page);

            #region 三种设置某个选项卡为当前选项卡的方法
            //this.tabControl1.SelectedIndex = index;
            this.tabControl1.SelectedTab = Page;
            //this.tabControl1.SelectTab("Page" + index.ToString());
            #endregion

            index++;
        }

        private void button2_Click(object sender, EventArgs e)
        {
            bool first = true;
            if (index > 0)
            {
                #region 两种删除某个选项卡的方法
                this.tabControl1.Controls.RemoveAt(this.tabControl1.SelectedIndex);
                //this.tabControl1.Controls.Remove(this.tabControl1.TabPages[this.tabControl1.TabPages.Count-1]);
                #endregion
            }
            else
            {
                return;
            }

            #region 用于设置删除最后一个TabPage后,将倒数第二个设置为当前选项卡
            if (first)
            {
                this.tabControl1.SelectedIndex = --index - 1;
                first = false;
            }
            else
            {
                this.tabControl1.SelectedIndex = index--;
            }
            #endregion
        }

        private void button3_Click(object sender, EventArgs e)
        {
            this.tabControl1.SelectedTab.Text = "xyt";//修改当前选项卡的属性
            //this.tabControl1.SelectedTab.Name = "";
            //this.tabControl1.SelectedTab.Tag = "";
            //this.tabControl1.SelectedTab.Select();
        }

        private void tabControl1_SelectedIndexChanged(object sender, EventArgs e)
        {

        }
    }
}源码:点击下载
Winform ErrorProvider控件
代码
using System;
using System.Collections.Generic;
using System.ComponentModel;
using System.Data;
using System.Drawing;
using System.Linq;
using System.Text;
using System.Threading.Tasks;
using System.Windows.Forms;

namespace ErrorProvider控件
{
    public partial class Form1 : Form
    {
        public Form1()
        {
            InitializeComponent();
        }

        private void button1_Click(object sender, EventArgs e)
        {
            // 设置闪烁样式
            // BlinkIfDifferentError 当图标已经显示并且为控件设置了一个新的错误字符串时,闪烁。
            // AlwaysBlink 当第一次显示错误图标时,或者当为控件设置了错误描述字符串而错误图标已经显示时,始终闪烁。
            // NeverBlink 错误图标从不闪烁
            errorProvider1.BlinkStyle = ErrorBlinkStyle.BlinkIfDifferentError;
            // 错误图标的闪烁速率(以毫秒为单位)。默认为 250 毫秒
            errorProvider1.BlinkRate = 500;
            //设置错误图标距离控件的距离
            errorProvider1.SetIconPadding(textBox1, 5);

            errorProvider1.SetError(textBox1, "请输入用户名");
        }

        private void button2_Click(object sender, EventArgs e)
        {
            //去掉错误图标
            errorProvider1.SetError(textBox1, "");
        }
    }
}
Winform 读取Resources图片
添加图片

二、使用方法
this.pictureBox1.Image = Properties.Resources.WindowNormal;
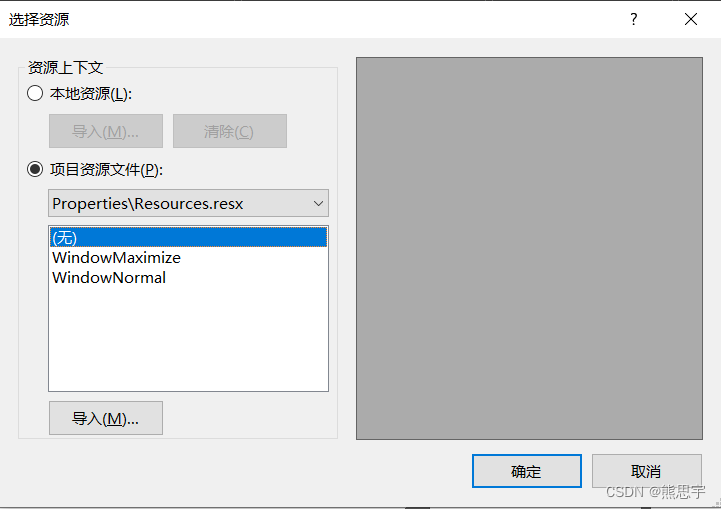
比如背景图片,点击这行属性后面到方框按钮

就会弹出一个界面,在项目资源文件这里,就可以找到对应到图片了
Winfrom 读取内存条占用大小,硬盘占用大小
先建一个读取系统数据工具类
using System;
using System.Management;

namespace Utils
{
    public class SystemInfo
    {
        #region 字段定义

        public static SystemInfo Instance;

        private long m_PhysicalMemory = 0;
        /// <summary>
        /// 获取物理内存
        /// </summary>
        public long PhysicalMemory { get => m_PhysicalMemory; }

        /// <summary>
        /// 获取可用内存
        /// </summary>
        public long MemoryAvailable
        {
            get
            {
                long availablebytes = 0;
                ManagementClass mos = new ManagementClass("Win32_OperatingSystem");
                foreach (ManagementObject mo in mos.GetInstances())
                {
                    if (mo["FreePhysicalMemory"] != null)
                    {
                        availablebytes = 1024 * long.Parse(mo["FreePhysicalMemory"].ToString());
                    }
                }
                return availablebytes;
            }
        }

        #endregion

        #region 构造函数

        static SystemInfo()
        {
            Instance = new SystemInfo();
        }

        private SystemInfo()
        {
            //获得物理内存
            ManagementClass mc = new ManagementClass("Win32_ComputerSystem");
            ManagementObjectCollection moc = mc.GetInstances();
            foreach (ManagementObject mo in moc)
            {
                if (mo["TotalPhysicalMemory"] != null)
                {
                    m_PhysicalMemory = long.Parse(mo["TotalPhysicalMemory"].ToString());
                }
            }
        }

        #endregion

        /// <summary>
        /// 获取内存大小
        /// </summary>
        /// <returns>
        /// 返回值
        /// 参数1代表内存已使用大小,
        /// 参数2代表内存总大小,
        /// 参数3代表已使用占用百分比
        /// </returns>
        public Tuple<double, double, double> GetMemorySize()
        {
            double used = (PhysicalMemory - MemoryAvailable) / 1024.0 / 1024.0 / 1024.0;//已用内存
            double physicalMemory = PhysicalMemory / 1024.0 / 1024.0 / 1024.0;//物理内存总量
            double proportion = (PhysicalMemory - MemoryAvailable) * 100.0 / PhysicalMemory;

            used = Math.Round(used, 2);
            physicalMemory = Math.Round(physicalMemory, 2);
            proportion = (int)proportion;

            return new Tuple<double, double, double>(used, physicalMemory, proportion);
        }

        /// <summary>
        /// 获取指定磁盘空间到大小
        /// </summary>
        /// <param name="hardDiskName"></param>
        /// <returns>
        /// 返回值
        /// 参数1代表磁盘已使用大小,
        /// 参数2代表磁盘总大小
        /// </returns>
        public Tuple<long, long> GetHardDiskSize(string hardDiskName)
        {
            long freeSpace = new long();
            long totalSize = new long();
            hardDiskName = hardDiskName + ":\\";
            System.IO.DriveInfo[] drives = System.IO.DriveInfo.GetDrives();
            foreach (System.IO.DriveInfo drive in drives)
            {
                if (drive.Name == hardDiskName)
                {
                    freeSpace = drive.TotalFreeSpace / (1024 * 1024 * 1024);
                    totalSize = drive.TotalSize / (1024 * 1024 * 1024);
                }
            }
            return new Tuple<long, long>(freeSpace, totalSize);
        }
    }
}
调用:
Tuple<long, long> tuple1 = SystemInfo.Instance.GetHardDiskSize("C");
Console.WriteLine(string.Format("硬盘剩余大小:{0}GB,总大小:{1}GB", tuple1.Item1, tuple1.Item2));

Tuple<double, double, double> tuple2 = SystemInfo.Instance.GetMemorySize();
Console.WriteLine(string.Format("获取内存大小,剩余大小:{0}GB,总大小:{1}GB,占用百分比:{2}%", tuple2.Item1, tuple2.Item2, tuple2.Item3));
输出:

Winform 全局捕获异常
代码
using System;
using System.Collections.Generic;
using System.Linq;
using System.Text;
using System.Threading;
using System.Threading.Tasks;
using System.Windows.Forms;

namespace Test
{
    static class Program
    {
        /// <summary>
        /// 应用程序的主入口点。
        /// </summary>
        [STAThread]
        static void Main()
        {
            try
            {
                //设置应用程序处理异常方式:ThreadException处理
                Application.SetUnhandledExceptionMode(UnhandledExceptionMode.CatchException);
                //处理UI线程异常
                Application.ThreadException += new System.Threading.ThreadExceptionEventHandler(Application_ThreadException);
                //处理非UI线程异常
                AppDomain.CurrentDomain.UnhandledException += new UnhandledExceptionEventHandler(CurrentDomain_UnhandledException);

                #region 应用程序的主入口点
                Application.EnableVisualStyles();
                Application.SetCompatibleTextRenderingDefault(false);
                Application.Run(new Form1());
                #endregion
            }
            catch (Exception ex)
            {
                string str = GetExceptionMsg(ex, string.Empty);
                MessageBox.Show(str, "系统错误", MessageBoxButtons.OK, MessageBoxIcon.Error);
            }
        }


        static void Application_ThreadException(object sender, System.Threading.ThreadExceptionEventArgs e)
        {
            string str = GetExceptionMsg(e.Exception, e.ToString());
            MessageBox.Show(str, "系统错误", MessageBoxButtons.OK, MessageBoxIcon.Error);
        }

        static void CurrentDomain_UnhandledException(object sender, UnhandledExceptionEventArgs e)
        {
            string str = GetExceptionMsg(e.ExceptionObject as Exception, e.ToString());
            MessageBox.Show(str, "系统错误", MessageBoxButtons.OK, MessageBoxIcon.Error);
        }

        /// <summary>
        /// 生成自定义异常消息
        /// </summary>
        /// <param name="ex">异常对象</param>
        /// <param name="backStr">备用异常消息:当ex为null时有效</param>
        /// <returns>异常字符串文本</returns>
        static string GetExceptionMsg(Exception ex, string backStr)
        {
            StringBuilder sb = new StringBuilder();
            sb.AppendLine("****************************异常文本****************************");
            sb.AppendLine("【出现时间】:" + DateTime.Now.ToString());
            if (ex != null)
            {
                sb.AppendLine("【异常类型】:" + ex.GetType().Name);
                sb.AppendLine("【异常信息】:" + ex.Message);
                sb.AppendLine("【堆栈调用】:" + ex.StackTrace);
            }
            else
            {
                sb.AppendLine("【未处理异常】:" + backStr);
            }
            sb.AppendLine("***************************************************************");
            return sb.ToString();
        }
    }
}
Winform 用线程写入TXT文件,并更新UI和进度
效果:

UI控件定义如下
共有三个控件,一个按钮:Button_Write,一个进度条:ProgressBar_WriteProgress,一个Label:Label_WriteStatus
新建脚本 DataWrite 用来管理写入操作
using System;
using System.IO;
using System.Text;
using System.Windows.Forms;

namespace Winform_vs2022
{
    public class DataWrite
    {
        //声明一个更新主线程的委托
        public delegate void UpdateUI(int step);
        public UpdateUI UpdateUIDelegate;
        //声明一个在完成任务时通知主线程的委托
        public delegate void AccomplishTask();
        public AccomplishTask TaskEndCallBack;

        private string Path = Application.StartupPath + "\\test.txt";

        public void Write(object lineCount)
        {
            StreamWriter writeIO = new StreamWriter(Path, false, Encoding.GetEncoding("gb2312"));
            string head = "编号,省,市";
            writeIO.Write(head);
            for (int i = 0; i < (int)lineCount; i++)
            {
                writeIO.WriteLine(i.ToString() + ",湖南,衡阳");
                //写入一条数据,调用更新主线程ui状态的委托
                UpdateUIDelegate(1);
            }
            //任务完成时通知主线程作出相应的处理
            TaskEndCallBack();
            writeIO.Close();
        }

        public DataWrite()
        {
            if (!File.Exists(Path))
            {
                Console.WriteLine("文件不存在");
            }
        }
    }
}
Form1.cs
using System;
using System.Threading;
using System.Windows.Forms;

namespace Winform_vs2022
{
    public partial class Form1 : Form
    {
        public Form1()
        {
            InitializeComponent();
        }

        private delegate void AsynUpdateUI(int step);
        private DataWrite DataWrite = new DataWrite();

        private void Button_Write_Click(object sender, EventArgs e)
        {
            //任务量为10000
            int taskCount = 10000;
            this.ProgressBar_WriteProgress.Maximum = taskCount;
            this.ProgressBar_WriteProgress.Value = 0;
            //绑定更新任务状态的委托
            DataWrite.UpdateUIDelegate += UpdataUIStatus;
            //绑定完成任务要调用的委托
            DataWrite.TaskEndCallBack += Accomplish;

            Thread thread = new Thread(new ParameterizedThreadStart(DataWrite.Write));
            thread.IsBackground = true;
            thread.Start(taskCount);
        }

        //更新UI
        private void UpdataUIStatus(int step)
        {
            //如果是跨线程访问,就切换线程,否则直接更新UI
            if (this.InvokeRequired)
            {
                this.Invoke(new AsynUpdateUI(delegate (int s)
                {
                    this.ProgressBar_WriteProgress.Value += s;
                    this.Label_WriteStatus.Text = this.ProgressBar_WriteProgress.Value.ToString() + "/" + this.ProgressBar_WriteProgress.Maximum.ToString();
                }), step);
            }
            else
            {
                this.ProgressBar_WriteProgress.Value += step;
                this.Label_WriteStatus.Text = this.ProgressBar_WriteProgress.Value.ToString() + "/" + this.ProgressBar_WriteProgress.Maximum.ToString();
            }
        }

        //完成任务时需要调用
        private void Accomplish()
        {
            MessageBox.Show("任务完成");
        }
    }
}
这里可以看出:
更新UI数据用的是委托,和网上一些帖子的区别是,这里在UI线程中定义了一个委托进行执行的,而进度条的进度则是遍历时,for循环中的 i 的值,线程除了UI线程之外,也只是开启了一个线程
源码下载地址:点击下载
Winform 摄像头识别二维码,保存图片
效果:
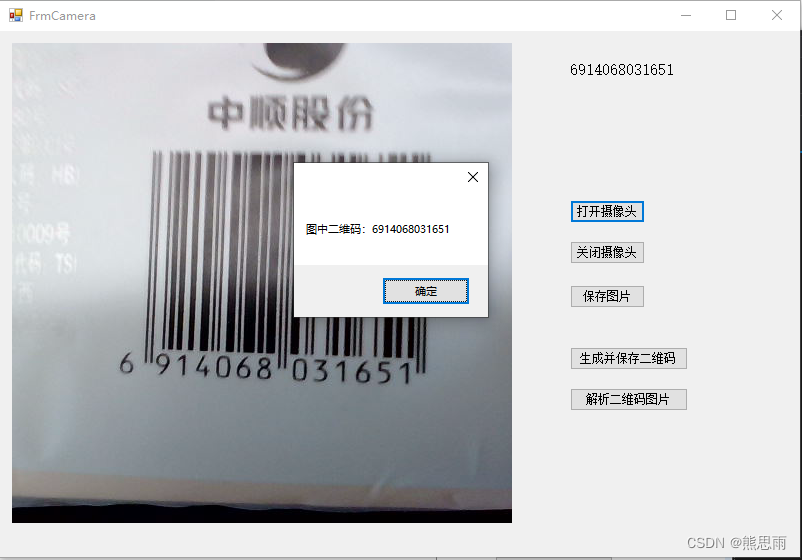
测试,识别速度还是可以的,摄像头自动对焦功能越好,识别就越快
源码:点击跳转
由于代码是复制别人的,所以这里就不帖代码了,代码我在原有的基础上做了一定的优化,有兴趣的可以原帖查看:点击跳转
Winform 判断窗体是否已打开
代码
Form1 form = null;

/// <summary>
/// 开始检测
/// </summary>
/// <param name="sender"></param>
/// <param name="e"></param>
private void button1_Click(object sender, EventArgs e)
{
    if (form==null) //如果子窗体为空则创造实例 并显示
    {
        form = new Form1();
        form.StartPosition = FormStartPosition.CenterScreen;//子窗体居中显示
        form.Show();
    }
    else
    {
        if (form.IsDisposed) //若子窗体关闭 则打开新子窗体 并显示
        {
            form = new Form1();
            form.StartPosition = FormStartPosition.CenterScreen;//子窗体居中显示
            form.Show();
        }
        else
        {
            form.Activate(); //使子窗体获得焦点
        }
    }
}
Winform 动态添加菜单列表,点击切换对应面板
效果:

一、需求
目前的效果是妥协后的效果,刚开始设想是有一个容器,动态向内部添加按钮列表,列表长度超过容器时可以上下拖动,于是我了解了一下Winfrom所有的组件,开始想用 ListView 方式向内部添加按钮,结果发现加进去的按钮的样式不一样,按钮的边缘上多了一圈灰边,调整起来也是特麻烦,于是就改用ListBox了,效果不是很理想,但效果算是达到了,做了当前这个例子,我不由得感觉,以后项目还是不要用Winform了,WPF就挺好的。
二、项目
新建一个Winform项目,拖入一个ListBox,一个Panel,一个Buttton即可,界面如下
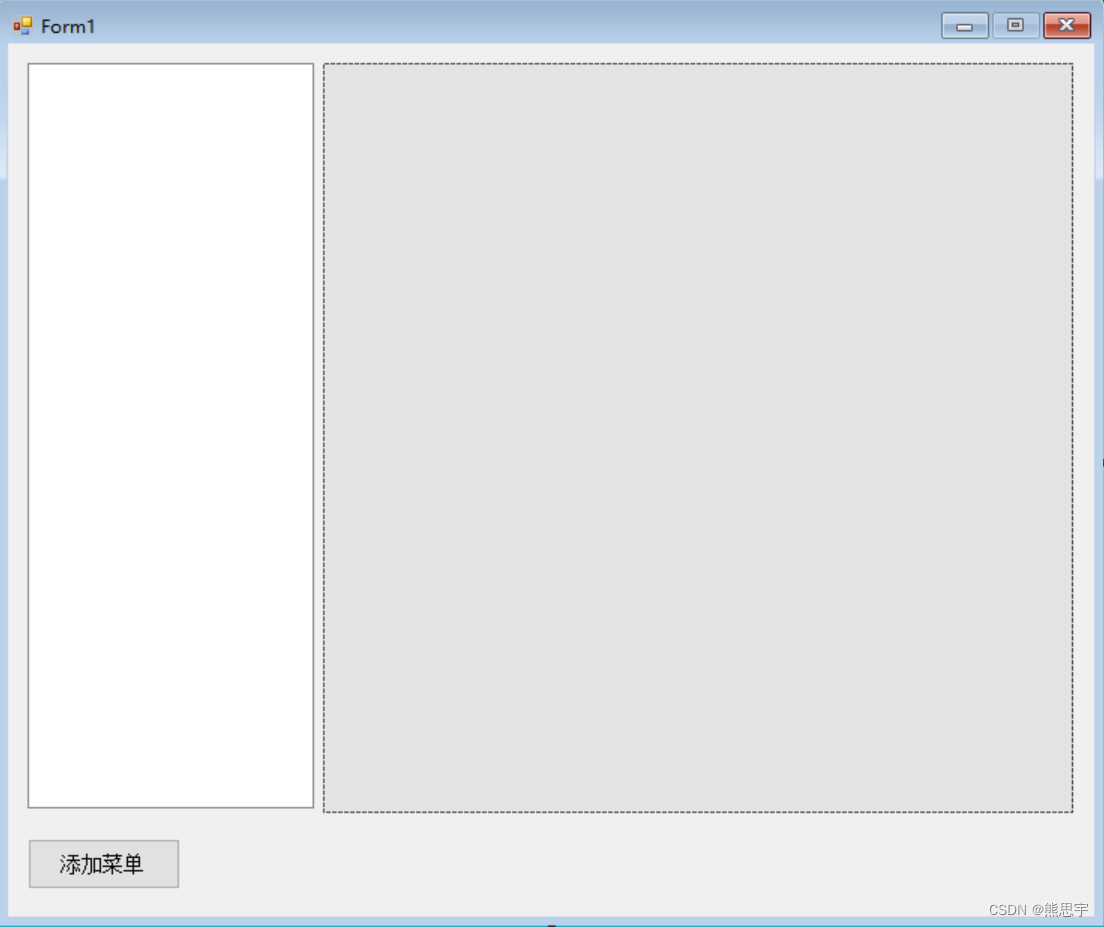
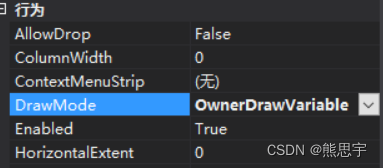
ListBox 还需要进行一系列设置,不然后面的代码不起作用
将Listbox的DrawMode属性设置为DrawMode.OwnerDrawVariable
再添加三个用户自定义界面,在界面里随便加几个文字,用来区分
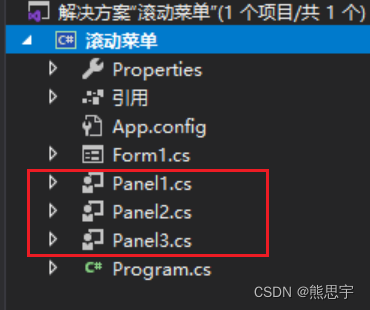
下面是Form1代码
using System;
using System.Collections.Generic;
using System.ComponentModel;
using System.Data;
using System.Drawing;
using System.Linq;
using System.Text;
using System.Threading.Tasks;
using System.Windows.Forms;

namespace 滚动菜单
{
    public partial class Form1 : Form
    {
        public Form1()
        {
            InitializeComponent();
        }


        private void Form1_Load(object sender, EventArgs e)
        {

        }

        private int ButtonIndex = 0;

        private void button1_Click(object sender, EventArgs e)
        {
            //Console.WriteLine("测试按钮:" + ((Button)sender).Name);
            ButtonIndex++;
            AddListBoxContent("菜单" + ButtonIndex);
        }


        private void AddListBoxContent(string content)
        {
            //读取当前ListBox列表长度
            int len = listBox1.Items.Count;
            //插入新的一行
            listBox1.Items.Insert(len, content);

            //列表长度大于30,那么就删除第1行的数据
            //if (len > 30)
            //    listBox1.Items.RemoveAt(0);

            //插入新的数据后,将滚动条移动到最下面
            //int visibleItems = listBox1.ClientSize.Height / listBox1.ItemHeight;
            //listBox1.TopIndex = Math.Max(listBox1.Items.Count - visibleItems + 1, 0);
        }

        private void listBox1_DrawItem(object sender, DrawItemEventArgs e)
        {
            e.DrawBackground();
            e.DrawFocusRectangle();
            StringFormat strFmt = new System.Drawing.StringFormat();
            strFmt.Alignment = StringAlignment.Center; //文本垂直居中
            strFmt.LineAlignment = StringAlignment.Center; //文本水平居中
            e.Graphics.DrawString(listBox1.Items[e.Index].ToString(), e.Font, new SolidBrush(e.ForeColor), e.Bounds, strFmt);
        }

        private void listBox1_MeasureItem(object sender, MeasureItemEventArgs e)
        {
            e.ItemHeight = 30;
        }

        private void listBox1_MouseDown(object sender, MouseEventArgs e)
        {
            int index = this.listBox1.IndexFromPoint(e.Location);
            if (index != System.Windows.Forms.ListBox.NoMatches)
            {
                //Console.WriteLine(index.ToString());
                string content = listBox1.Items[index].ToString();
                Console.WriteLine(content);

                if (index == 0)
                {
                    panel1.Controls.Clear();
                    Panel1 test = new Panel1();
                    test.Location = new Point((panel1.Width - test.Width) / 2, 0);//子控件位置
                    test.Show();
                    panel1.Controls.Add(test);
                }
                else if (index == 1)
                {
                    panel1.Controls.Clear();
                    Panel2 test = new Panel2();
                    test.Location = new Point((panel1.Width - test.Width) / 2, 0);//子控件位置
                    test.Show();
                    panel1.Controls.Add(test);
                }
                else if(index == 2)
                {
                    panel1.Controls.Clear();
                    Panel3 test = new Panel3();
                    test.Location = new Point((panel1.Width - test.Width) / 2, 0);//子控件位置
                    test.Show();
                    panel1.Controls.Add(test);
                }
            }
        }
    }
}
给控件 listBox1 的事件选上对应的方法
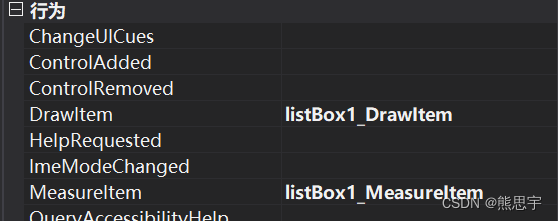

还有添加事件按钮也选上对于的方法
从代码中可以看出,由于只是添加了三个自定义面板,所以菜单列表只有1,2,3,有效,后面的我就不加了,这里也可以用一个通用面板,实例化时,传入固定的参数,根据参数来显示不同的控件。
运行后,效果就如文章开头所示
源码:点击下载
Winform FlowLayoutPanel 控件居中排列
官方文档
微软官方的文档:点击跳转
向容器内添加组件
Label label = new Label();label.AutoSize = true;label.Text = "123";flowLayoutPanel1.Controls.Add(label);
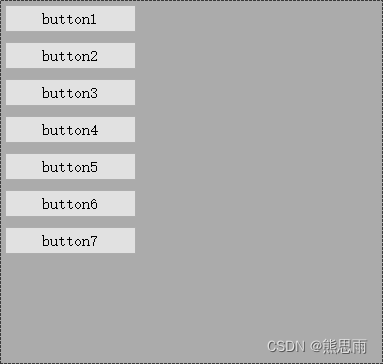
FlowLayoutPanel 控件排列的几种方式
1.LeftToRight

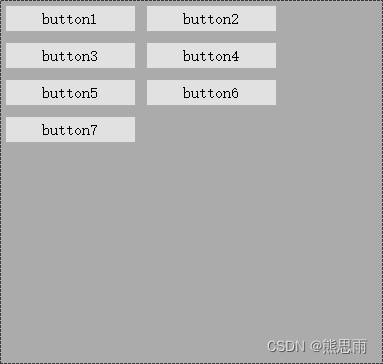
2. TopDown

3.RightToLeft


4.BottomUp

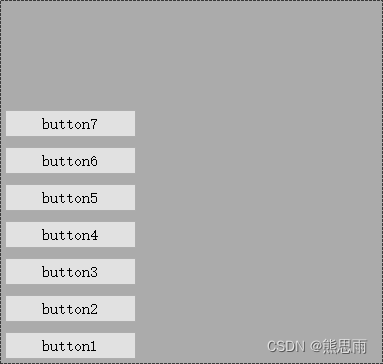
FlowLayoutPanel 控件居中排列
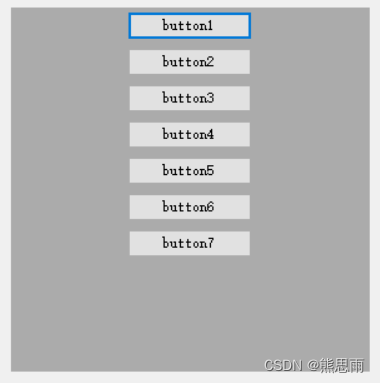
使用控件居中排列,一般使用 TopDown作为排序方法


但是在官方的文档中,目前还没找到自动居中的方法,不过有个方式可以设置,就是内边距,在启动软件的时候,可以执行下面的代码进行自动计算,并添加内边距,使得控件会自动居中
//获容器的宽度
Size flowLayoutPanelSize = flowLayoutPanel1.Size;
//获取按钮的宽度
Size buttonSize = flowLayoutPanel1.Controls[0].Size;
//内边距 = (容器的宽度  / 2)- (按钮宽度 / 2) - 3 自带3像素内边距
int paddingLift = (flowLayoutPanelSize.Width / 2) - (buttonSize.Width / 2) - 3;

Padding paddings = flowLayoutPanel1.Padding;
paddings.Left = paddingLift;
flowLayoutPanel1.Padding = paddings;
通过设置内边距,容器内的所有按钮都居中了,如下
结束
如果这个帖子对你有用,欢迎 关注 + 点赞 + 留言,谢谢
end
猜你喜欢
- 【C#】C# Winform 文本面板带滚动条
- 在PC软件开发中经常有这样的需求,需要在一个固定大小的面板中显示一些内容,并且面板能上下拖动,将所有的内容完整的展示,有点类似网页上看新闻,如果要在 winfrom 中要如何实现的呢,下面就演示如何实现的吧效果:1.新建一个winform 项目,在界面中拖入一个Panel 将 panel1 的 AutoScroll 设置为 True2.再次拖入一个 Panel ,将高度拉长,这时就自动出现了滚动条,只是此时里面还没有任何内容,下面就在 panel2 中加入一点内容。
- 【C#】C# Winform 热更新 基于ECSharp框架
- 目录一、简介二、 ECSharp热更新演示三、Winform 热更新实战结束一、简介ECSharp (原:EasySharpFrame)github 地址:https://github.com/suxf/ECSharp介绍:1.HTTP服务 2.Websocket服务 3.HyperSocket<自定义Socket服务> 4.TimeFlow<时间流> 5.Sqlserver数据库助手 6.Mysql数据助手 7.Redis数据库助手 8.Log功能 9.热更新
- 【C#】C#超急速举例入门-适用有C/C++语言基础
- 前提编程环境:vs2022电脑系统:win10学习目的:能看懂c#,不纠结各种细节,快速适应开发。入门篇程序结构变量类型类似c语言,不掌握细节,int,float,double都有。输入输出Console.WriteLine("变量0:{0}", para0); var a=Console.ReadLine(); 运算符几乎相同。sizeof();typeof();取地址,取值:&,*;三元运算符: ? :判断类型:is强制转换:as。注
- 【C#】C# Winform 三层架构
- 一、介绍三层架构是 C# 桌面开发中比较常用的框架,是由 表示层(UI)、业务逻辑层(BLL)和数据访问层(DAL)三层架构组成,目的是为了 “高内聚,低耦合”。开发人员分工更明确,将精力更专注于应用系统核心业务逻辑的分析、设计和开发,加快项目的进度,提高了开发效率,有利于项目的更新和维护工作。从三层架构可以看到,很类似于 Web 前端开发的 MVC 框架(视图View,模型Model,控制Contorller),但本质上也有不同的地方,比如都有视图(三层中叫 UI),Mod
- 【C#】从零开始用C#写一个桌面应用程序(二)一个表白程序
- 恶搞表白小程序如何添加按钮,如何添加属性和事件请移步前文。基础操作第一步:新建窗口 在工具箱内找到label和button,拖到form上,设置它们的size属性,autosize属性,text属性。第二步:添加事件为了实现我们的效果,需要给三个按钮分别设计点击事件,鼠标移入事件,鼠标点下事件。分别为click,mouseenter,mousedown事件。第三步:实现移动逻辑this获取form对象,clientsize获取实时大小,使用随机数值,设置对应按钮位置。将对应
- 【C#】C# Winform ListView用法
- 目录添加标题显示网格添加数据到表格中自定义其他属性结束添加标题在 Winfrom 界面中添加一个 ListView 组件,然后点击右上角的箭头,点击编辑列添加下面标题,然后点击确定此时 ListView 中还是一片空白,不能显示这些标题,在视图这里选择 Details就会如下图所示,虽然标题出来了,内容确实一块白版,此时还是觉得 DataGridView 组件好用啊显示网格此时,表格只是一片空白,可以在属性面板中设置,显示网格,如下图 这时,就如下图所示,效果就出来了,但是
- 【C#】C# NLua Winform 热更新
- 一、概述NLua 是一个用于 .NET 平台的 Lua 脚本绑定库。它允许在 C# 代码中嵌入 Lua 脚本,并允许两者之间进行交互。NLua 的主要特点包括:轻量级:NLua 是一个轻量级的库,易于集成到现有的 .NET 项目中。动态类型:Lua 是动态类型的语言,这意味着变量的类型可以在运行时改变。灵活的绑定:NLua 提供了灵活的绑定机制,使得 C# 和 Lua 之间的数据交互变得简单。丰富的 API:NLua 提供了丰富的 API,以便在 Lua 脚本中调用 .NET 的类和方法。调试支
- 【C#】C# 开源框架(整理)
- C# 开源框架(整理)Json.NEThttp://json.codeplex.com/Json.Net 是一个读写Json效率比较高的.Net框架.Json.Net 使得在.Net环境下使用Json更加简单。通过Linq To JSON可以快速的读写Json,通过JsonSerializer可以序列化你的.Net对象。让你轻松实现.Net中所有类型(对象,基本数据类型 等)和Json的转换。Math.NEThttp://www.mathdotnet.com/Math.NET的目标是为提供一款
